So as the snow scuppered my plans this weekend I decided to get ahead of the seasons and rock out some truly summer colours to bring some sunshine into my life!
I absolutely love acid colours so didn't feel I should have to wait til summer to wear them!
The base orange is two coats of Angelica Nail Colour in Hip Hop from Primark. I then free hand painted a inverted triangle using Barry M Nail Paint in Matt White, followed by a smaller triangle in Bourjois Ultra Shine So Laque in Lime Catwalk. Then using a black nail art pen, I used Models Own, I defined the triangles.
The result would have been a lot better if I'd used tape for cleaner lines but oh well! I'm trying not to sweat the small stuff as much in 2013!
I used W7 top coat to finish off.
Happy painting... the nailist xxx
Showing posts with label Barry M. Show all posts
Sunday, 20 January 2013
Sunday, 23 December 2012
Christmas nail art overload!
So it's almost the night before Christmas and up til now I haven't done any Christmas inspired nails. I've had a few designs in mind but for one reason or another haven't had time to do them. So tonight it's a Christmas nail art overload! 
It will take me ages to go through how I did each nail so I won't go there, but here's which polishes I used...
Rudolph thumb
Base colour - No7 Stay Perfect limited edition in Sultry Sands
Face - Essie Nail Colour in Lady Godiva
Eyes - 17 Lasting Fix in Mini Skirt (from limited edition Best of British nail art kit) and Models Own nail art pen in black
Nose - 17 Fast Finish in Knockout Red (from limited edition Best of British nail art kit)
Christmas tree index finger
Base colour - No7 Stay Perfect limited edition in Sultry Sands
Tree - one coat of Ruby and Millie Nail Color in Green 720C followed by a coat of Bad Apple in Green Bramley
Tinsel - 17 Fast Finish in Knockout Red (from limited edition Best of British nail art kit) with dots using a No7 nail art pen in silver
A silver nail art diamante for the star on top!
Santa suit middle finger
Base colour - 17 High Gloss in Risky Red
Fur trim - 17 Lasting Fix in Mini Skirt (from limited edition Best of British nail art kit)
Belt & buttons - Models Own nail art pen in black
Christmas pudding ring finger
Base colour - No7 Stay Perfect limited edition in Sultry Sands
Christmas pud - Essie Nail Colour in Lady Godiva
Icing - 17 Lasting Fix in Mini Skirt (from limited edition Best of British nail art kit)
Berries - 17 Fast Finish in Knockout Red (from limited edition Best of British nail art kit)
Holly leaf - Ruby and Millie Nail Color in Green 720C
Gift little finger
Base colour - Barry M Nail Paint Instant Effects in Gold Foil
Ribbon & bow - 17 Fast Finish in Knockout Red (from limited edition Best of British nail art kit)
My particular favourite is Rudolph!
Then I've just mixed up the designs on the right hand...
Right I'm going to eat my body weight in mince pies!
Merry Christmas and happy painting... the nailist xxx

It will take me ages to go through how I did each nail so I won't go there, but here's which polishes I used...
Rudolph thumb
Base colour - No7 Stay Perfect limited edition in Sultry Sands
Face - Essie Nail Colour in Lady Godiva
Eyes - 17 Lasting Fix in Mini Skirt (from limited edition Best of British nail art kit) and Models Own nail art pen in black
Nose - 17 Fast Finish in Knockout Red (from limited edition Best of British nail art kit)
Christmas tree index finger
Base colour - No7 Stay Perfect limited edition in Sultry Sands
Tree - one coat of Ruby and Millie Nail Color in Green 720C followed by a coat of Bad Apple in Green Bramley
Tinsel - 17 Fast Finish in Knockout Red (from limited edition Best of British nail art kit) with dots using a No7 nail art pen in silver
A silver nail art diamante for the star on top!
Santa suit middle finger
Base colour - 17 High Gloss in Risky Red
Fur trim - 17 Lasting Fix in Mini Skirt (from limited edition Best of British nail art kit)
Belt & buttons - Models Own nail art pen in black
Christmas pudding ring finger
Base colour - No7 Stay Perfect limited edition in Sultry Sands
Christmas pud - Essie Nail Colour in Lady Godiva
Icing - 17 Lasting Fix in Mini Skirt (from limited edition Best of British nail art kit)
Berries - 17 Fast Finish in Knockout Red (from limited edition Best of British nail art kit)
Holly leaf - Ruby and Millie Nail Color in Green 720C
Gift little finger
Base colour - Barry M Nail Paint Instant Effects in Gold Foil
Ribbon & bow - 17 Fast Finish in Knockout Red (from limited edition Best of British nail art kit)
My particular favourite is Rudolph!
Then I've just mixed up the designs on the right hand...
Right I'm going to eat my body weight in mince pies!
Merry Christmas and happy painting... the nailist xxx
Labels:
17,
Bad Apple,
Barry M,
Christmas,
Essie,
fun,
mixed design,
Models Own,
nail art,
No7,
Ruby and Millie
Sunday, 25 November 2012
Gilted pink
Ooh I'm back on my sofa catching up on X factor after a party weekend in London. My body is feeling a bit worse for wear after far too many drinks and definitely too much fast food from Camdem market, which always seems like such a good idea at the time. But hey my nails are still looking good!
This is a two coat base of Barry M Nail Paint in Black followed by a free handed pink inverted triangle in Max Factor Nailffinity in Disco Pink. Then I added a lovely gilted edge to define the pink triangles with a 17 nail art pot in Gold (this was from one of their Limited edition 'Hot Metals' nail art kits).
As always, I finished off with a good coating on high shine quick dry top coat - this time I used INM Out the Door.
Right I'm off to drown myself in carbs before detox Monday arrives.
Happy painting... the nailist xxx
This is a two coat base of Barry M Nail Paint in Black followed by a free handed pink inverted triangle in Max Factor Nailffinity in Disco Pink. Then I added a lovely gilted edge to define the pink triangles with a 17 nail art pot in Gold (this was from one of their Limited edition 'Hot Metals' nail art kits).
As always, I finished off with a good coating on high shine quick dry top coat - this time I used INM Out the Door.
Right I'm off to drown myself in carbs before detox Monday arrives.
Happy painting... the nailist xxx
Labels:
17,
Barry M,
black,
bright pink,
gold,
Max factor,
simple,
triangles,
tribal
Sunday, 11 November 2012
Falling to pieces
Quick post today as I must go to bed at a decent hour. After a lovely weekend visiting the parents and basically eating, I've watched X Factor and have now vowed to get a good night's sleep. However, I know I'm myself as my sister and I are currently addicted to playing scrabble and hangman against each other via Facebook! Seriously, we can't put it down and are ever so slightly obsessed... she's the hangman queen but I usually wipe the floor with her on scrabble. Reading that back we sound like complete losers... I promise you we're actually quite interesting, trendy and cool people... honestly!
Anyway, enough of my rambling.. tonight's post is something I saw on a YouTube tutorial a while a go and have been meaning to try.
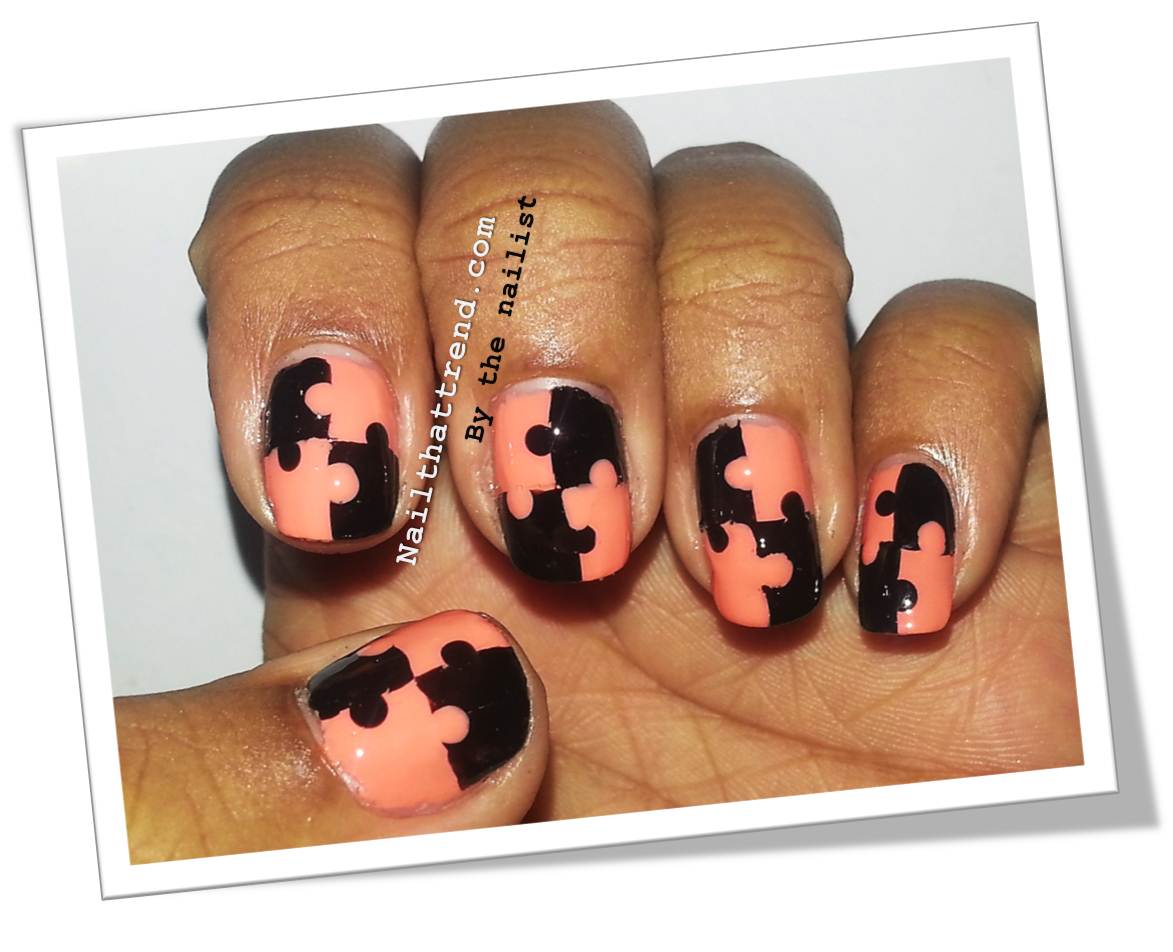
I started with a base of Models Own in Fuzzy Peach then free hand painted the black squares with Barry M Nail Paint in Black. If you struggle painting free hand then you can either add some guide lines with a nail art pen or you could try using sellotape to tape off the squares. Just make sure you wait till the base colour is completely dry before taping and then once you've painted the black pull off the tape before it dries.
Then using a dotting tool I simply added dots to create the jigsaw connections. Quite simple really.
Finished off with a coat of Seche Vite quick dry top coat.
Happy painting... the nailist xxx
Anyway, enough of my rambling.. tonight's post is something I saw on a YouTube tutorial a while a go and have been meaning to try.
I started with a base of Models Own in Fuzzy Peach then free hand painted the black squares with Barry M Nail Paint in Black. If you struggle painting free hand then you can either add some guide lines with a nail art pen or you could try using sellotape to tape off the squares. Just make sure you wait till the base colour is completely dry before taping and then once you've painted the black pull off the tape before it dries.
Then using a dotting tool I simply added dots to create the jigsaw connections. Quite simple really.
Finished off with a coat of Seche Vite quick dry top coat.
Happy painting... the nailist xxx
Labels:
Barry M,
black,
fun,
Models Own,
peach
Thursday, 8 November 2012
Mixed up monochrome - Nailed It's Two Bottle Challenge
Hey peeps
The first challenge of the week was Polish Days' MAN-icure, now it's time for Nailed It's 'Two Bottle Challenge' to celebrate the blog's one year anniversary and reaching an amazing 555,555 views, whoop!
The rules are simple - use two bottles of polish to create a design without the use of stamping or embellishments. You are allowed to mix the colours to create more colours but for me it had to be plain black and white because I love the monochrome look and you can create really striking designs. I also love mixing up designs because I'm a girl who wants it all - not just happy with the one design so I get carried away. So here it is...
My two bottles were Models Own Pro in French White and Barry M Nail Paint in Black. I used striping tape to create the straight lines on the ring finger and a dotter for the polka dots, but everything else is free handed.
I then did the same designs but mixed them up on my right hand...
I love it! Hope you do too. Head over to Nailed it to check out the other entries and of course her fab blog. Happy Blogiversary Nailed it!
Happy painting.. the nailist xxx
The first challenge of the week was Polish Days' MAN-icure, now it's time for Nailed It's 'Two Bottle Challenge' to celebrate the blog's one year anniversary and reaching an amazing 555,555 views, whoop!
The rules are simple - use two bottles of polish to create a design without the use of stamping or embellishments. You are allowed to mix the colours to create more colours but for me it had to be plain black and white because I love the monochrome look and you can create really striking designs. I also love mixing up designs because I'm a girl who wants it all - not just happy with the one design so I get carried away. So here it is...
My two bottles were Models Own Pro in French White and Barry M Nail Paint in Black. I used striping tape to create the straight lines on the ring finger and a dotter for the polka dots, but everything else is free handed.
I then did the same designs but mixed them up on my right hand...
I love it! Hope you do too. Head over to Nailed it to check out the other entries and of course her fab blog. Happy Blogiversary Nailed it!
Happy painting.. the nailist xxx
Friday, 2 November 2012
Baby you're a firework - or not in this case!
After the success of my Halloween nail design, I set my sights on creating something fab for Bonfire night. EPIC FAIL!
I still think my idea was a good one but the execution not so much. I intended on doing a half moon design which looked like a Catherine Wheel firework but I've ended up with regular old bonfires!
Apologies for the very dodgy photo - they were a nightmare to take without flash glare so I've had to do a bit of post light balancing which isn't great at all - they are a lot more glittery and fire like in the flesh! Also you may notice my thumb nail is looking a bit worse for wear around the edges - I've got a really low break, too low to cut off (ouch!) so I've had to put a silk wrap on to hold it together but the brush-on gel (basically the essential bit which makes it all bind together) was all dried up. So I just had to cover the silk bit with base coat, which of course doesn't really work! I give myself a hour tomorrow before I end up with a painful ripped off nail.
Anyway, all in all not my finest work but topical all the same.
I still think my idea was a good one but the execution not so much. I intended on doing a half moon design which looked like a Catherine Wheel firework but I've ended up with regular old bonfires!
Apologies for the very dodgy photo - they were a nightmare to take without flash glare so I've had to do a bit of post light balancing which isn't great at all - they are a lot more glittery and fire like in the flesh! Also you may notice my thumb nail is looking a bit worse for wear around the edges - I've got a really low break, too low to cut off (ouch!) so I've had to put a silk wrap on to hold it together but the brush-on gel (basically the essential bit which makes it all bind together) was all dried up. So I just had to cover the silk bit with base coat, which of course doesn't really work! I give myself a hour tomorrow before I end up with a painful ripped off nail.
Anyway, all in all not my finest work but topical all the same.
I started with a base of Estee Lauder Pure Colour in 20 Perfect Storm. Then once dry went over this with Barry M Nail Paint in Black Multi Glitter, leaving a semi circle of the base colour exposed at the base of the nail.
I then just built up the sparks of a variety of colours, creating flicks with a striping brush:-
Barry M Nail Paint Instant Effects in Gold Foil
17 Fast Finish in Potion
17 Fast Finish in Fury
17 HoloNial Polish in Silver
No7 Speed Dry in Queenie (this is the small flashes of red/pink)
Barry M Nail Paint in Silvery Lilac
LA Splash Nail Polish in Midnight Rain
No7 Stay Perfect Limited Edition in Golden Palms ( I used this one to define the edge of the half moon too)
Here's a pic of the whole kit
As always, finish off with a top coat to protect the design - I used INM Out the Door
Happy painting... the nailist xxx
Labels:
17,
Barry M,
Bonfire night,
Estee Lauder,
LA Splash,
No7
Sunday, 28 October 2012
The graveyard shift
Well I had to do it... spooky nails for Halloween is a must. Unfortunately I'm not going to any Halloween parties this year so this is purely for my own enjoyment (and yours of course!)...
As you can see I have a creepy graveyard design which is on top of a purple grey gradient.
I started out with a base of deep purple. I used a really old bottle of a colour that I love but it's one of those cheapo brands of the market called 'La Femme Beauty' (!) and has no shade name sorry. Any deep purple will do, just think stormy night sky - Revlon in Plum Night is a good option.
I then layered on a gradient of Mavala in shade 12 Berlin, using a cosmetic sponge. Best way I've found is you paint the polish onto the sponge and dab on the nail starting by covering as far down as you want the gradient to start. I did all 10 nails and then went back to the start to allow each layer to dry. Then dabbed on more just starting a bit further up the nail tip so to create denser colour towards the end. Trick is to keep loading the sponge. If you allow it to dry out you just end up sponging the polish off the nail.
To finish off the gradient and to add some sparkle to the misty graveyard scene I sponged on a bit of Barry M Nail Paint in Silvery Lilac where the grey met the purple. Here's the gradient before the graveyard was added...
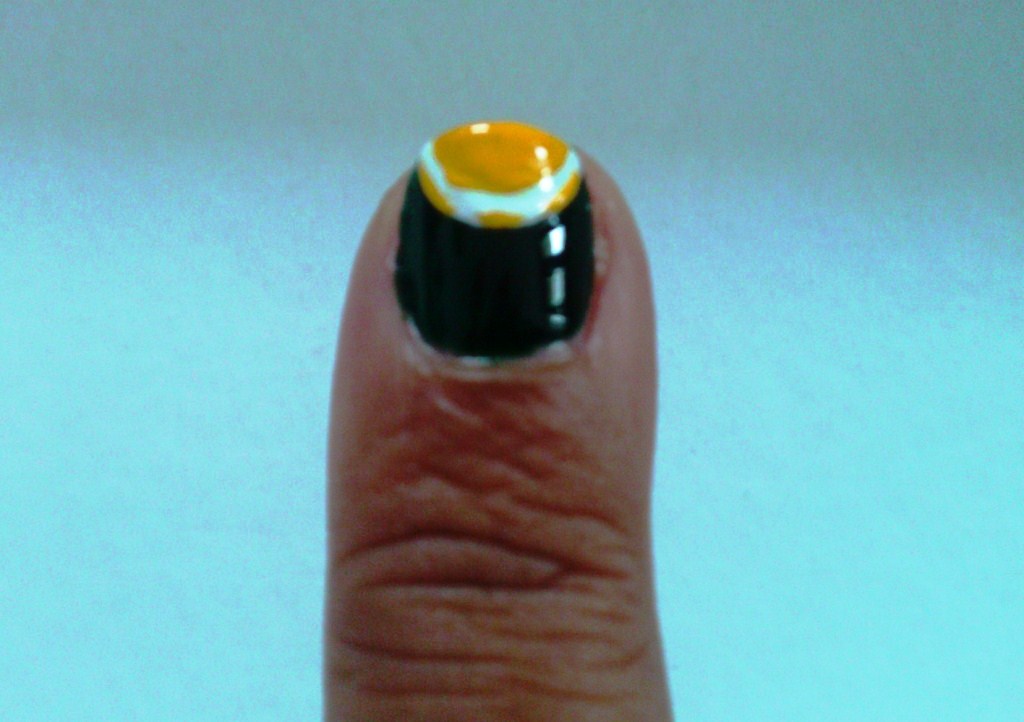
I then freehand drew on the graveyard using a black nail art pen and a yellow one for the moon.
For the spiderweb, use a black nail art pen and draw three diagonal lines from one corner of your nail to 3/4 of the way down. Then connect these with evenly spaced curved lines. I added a bit of silver with a nail art pen for extra pop.
Finish off with a quick dry top coat - I used Save the Nail 45 Second Top Coat... and there you have it!
Happy Halloween... the nailist xxx
As you can see I have a creepy graveyard design which is on top of a purple grey gradient.
I started out with a base of deep purple. I used a really old bottle of a colour that I love but it's one of those cheapo brands of the market called 'La Femme Beauty' (!) and has no shade name sorry. Any deep purple will do, just think stormy night sky - Revlon in Plum Night is a good option.
I then layered on a gradient of Mavala in shade 12 Berlin, using a cosmetic sponge. Best way I've found is you paint the polish onto the sponge and dab on the nail starting by covering as far down as you want the gradient to start. I did all 10 nails and then went back to the start to allow each layer to dry. Then dabbed on more just starting a bit further up the nail tip so to create denser colour towards the end. Trick is to keep loading the sponge. If you allow it to dry out you just end up sponging the polish off the nail.
To finish off the gradient and to add some sparkle to the misty graveyard scene I sponged on a bit of Barry M Nail Paint in Silvery Lilac where the grey met the purple. Here's the gradient before the graveyard was added...
I then freehand drew on the graveyard using a black nail art pen and a yellow one for the moon.
For the spiderweb, use a black nail art pen and draw three diagonal lines from one corner of your nail to 3/4 of the way down. Then connect these with evenly spaced curved lines. I added a bit of silver with a nail art pen for extra pop.
Finish off with a quick dry top coat - I used Save the Nail 45 Second Top Coat... and there you have it!
Happy Halloween... the nailist xxx
Thursday, 18 October 2012
Crazy nail polish lady!
Yes this is what I need to be called... despite a recent collection count totaling over the 350 mark, I've been unable to resist the urge to buy more polish! And this time I've gone way over the top - 15 new ones found their way home with me.. oops! So in order to give my purchase a purpose, more than my obvious craziness and glitter nails being on trend, I thought I'd show a sample of each one for your viewing pleasure... very rough painted, so all over the place and some of the glitters/metallics have been victim to flash glare but it gives you an idea.
Little finger - Bourjois So Laque Ultra Shine in Lime Catwalk (2 coats)
Ring finger - Barry M Nail Paint in Silvery Lilac (2 coats)
Middle finger - Miss Sporty Metallic Flip (2 coats) this actually looks the colour above from one angle then a metallic olive green from another - very cool!
Index finger - Barry M Nail Paint in Pink Sliver Glitter (2 coats)
Thumb - Barry M Nail Paint in Black Multi Glitter (1 coat!) - this looks a million times better in the flesh, the glitter is really multicoloured.
Little finger - 17 Fast Finish in Potion (2 coats)
Ring finger - Barry M Nail Paint in Silver Multi Glitter (3 coats)
Middle finger - Rimmel Precious Stones in 001 Diamond Dust (2 coats) - this looks like really uncrusted diamonds in the flesh
Index finger - 17 Fast Finish in Fury (2 coats)
Thumb - Bourjois 1 Second Texture Gel in 20 Perle Illusion (2 coat)
Little finger - Bourjois So Laque Ultra Shine in Bleu Asphalte (2 coats)
Ring finger -Revlon Nail Polish in 261 Sparkling (4 coats!)
Middle finger - Bourjois 1 Second Texture Gel in 16 Bleu Moonlight (1 coat!)
Index finger - 17 Holo Nail Polish in Silver (2 coats)
Thumb - Models Own Nail Polish in Fuzzy Peach (2 coat)
Little finger - Bourjois So Laque Ultra Shine in Lime Catwalk (2 coats)
Ring finger - Barry M Nail Paint in Silvery Lilac (2 coats)
Middle finger - Miss Sporty Metallic Flip (2 coats) this actually looks the colour above from one angle then a metallic olive green from another - very cool!
Index finger - Barry M Nail Paint in Pink Sliver Glitter (2 coats)
Thumb - Barry M Nail Paint in Black Multi Glitter (1 coat!) - this looks a million times better in the flesh, the glitter is really multicoloured.
Little finger - 17 Fast Finish in Potion (2 coats)
Ring finger - Barry M Nail Paint in Silver Multi Glitter (3 coats)
Middle finger - Rimmel Precious Stones in 001 Diamond Dust (2 coats) - this looks like really uncrusted diamonds in the flesh
Index finger - 17 Fast Finish in Fury (2 coats)
Thumb - Bourjois 1 Second Texture Gel in 20 Perle Illusion (2 coat)
Little finger - Bourjois So Laque Ultra Shine in Bleu Asphalte (2 coats)
Ring finger -Revlon Nail Polish in 261 Sparkling (4 coats!)
Middle finger - Bourjois 1 Second Texture Gel in 16 Bleu Moonlight (1 coat!)
Index finger - 17 Holo Nail Polish in Silver (2 coats)
Thumb - Models Own Nail Polish in Fuzzy Peach (2 coat)
Happy Painting (and shopping!)... the nailist xxx
Labels:
17,
Barry M,
Bourjois,
glitter,
metallic,
Miss Sporty,
Models Own,
Revlon,
Rimmel,
Swatches
Sunday, 30 September 2012
Viva Las Vegas!
Today is a second stab at a Vegas design for Chelsea. Trying to capture the glitz and glam of Vegas with some nail art detail. There's three different type of nails which can be worn as is or used on every single nail. I've tred to mix it up a bit as my last attempt was OTT nail art detail. Hope you like it!...

![]() |
Start with the base colour on all nails. The glittered nails have a black base, I used Max Factor Nailfinity in Onyx. The cream is No7 Anniversary Colour in 60's Mini Skirt and the index finger has a deep green to match poker table felt.. I used Ruby & Millie Nail Colour in Green 720C .
![]() |
| Step 1 |
![]() |
| Step 2 |
Now to both index fingers, using a white nail art pen, add a semi circular tip guide line.
![]() |
| Step 3 |
![]() |
| Step 4 |
While that's drying, use the dotter on a black nail art pen to create the dice pattern on the middle fingers. You can pick whichever numbers you'd like but I think 5 and 6 look more obviously like dice.
![]() |
| Step 5 |
Once the white semi circles have dried you can add the poker chip detail... this is the most difficult part.
![]() |
| Step 6 left |
![]() |
| Step 6 right |
![]() |
| Step 7 |
Happy painting... the nailist xxx
Labels:
Barry M,
glitter,
H and M,
Max factor,
Models Own,
nail art,
No7,
Ruby and Millie,
Vegas
Friday, 28 September 2012
Eat cake, make money for charity!
Today is Macmillan Cancer Support's 'World's Biggest Coffee Morning'. Donate to a very worthy cause by eating cake... what's not to like?!That's exactly what I'll be doing while sporting my Macmillan-esque nails!
Base coat: Save the Nail Eau so hydrating
White: Barry M Matt White
Green: W7 Neon Green
Detail: Models Own white & black nail art pens
Top coat: inm Out the Door quick dry
Happy painting (cake eating and coffee drinking!)... the nailist xxx
Labels:
Barry M,
charity,
green,
Macmillan,
mixed design,
Models Own,
nail art,
W7,
white
Monday, 24 September 2012
Vegas baby!
A few posts back, Chelsea, one of my lovely followers, requested a Vegas inspired design for her imminent trip to the Sin City. I've been toying with a few ideas (avoiding the obvious playing cards on her request) and I just had to post this practice one as it went a lot better than I thought...
So hopefully you'll have realised the design is based on slot machine icons. The thumbnail says 'Jackpot' and is probably the weakest one but I couldn't find a 5th symbol! This was a practice so the base is all over the place and one the cherries looks a bit odd but I definitely think there's potential! What do you think Chelsea? They're all free hand painted so you need a steady hand.
Only down side is that as I was only practicing and fully intended on removing, I couldn't be bothered to do my right hand... going to look a bit odd for work tomorrow!
The white base is Barry M Matt White, the design is created using various nail art pens mainly Models Own and the gold on the thumb is Nail Polish by H&M Nail in Golden Treasure.
I'll keep on thinking and post something that doesn't require as much precision!
Happy painting.. the nailist xxx
So hopefully you'll have realised the design is based on slot machine icons. The thumbnail says 'Jackpot' and is probably the weakest one but I couldn't find a 5th symbol! This was a practice so the base is all over the place and one the cherries looks a bit odd but I definitely think there's potential! What do you think Chelsea? They're all free hand painted so you need a steady hand.
Only down side is that as I was only practicing and fully intended on removing, I couldn't be bothered to do my right hand... going to look a bit odd for work tomorrow!
The white base is Barry M Matt White, the design is created using various nail art pens mainly Models Own and the gold on the thumb is Nail Polish by H&M Nail in Golden Treasure.
I'll keep on thinking and post something that doesn't require as much precision!
Happy painting.. the nailist xxx
Labels:
Barry M,
H and M,
Max factor,
Models Own,
nail art,
Vegas,
white
Sunday, 19 August 2012
Cupcake dreams
So one of my many dreams (I'm a bit of an idealistic dreamer!) is to one day own a cupcake cafebar, famous for the best cupcakes in town which you can buy to take away or sit in an enjoy with a cocktail. There would of course be somewhere to get your nails done while sipping your cocktail. I imagine the decor will be retro glam - think American diner meets Breakfast at Tiffany's! Well, one day maybe... In the meantime the dream has inspired my latest design, 'Cupcake Dream's, and here's the how to.
(By the way, it would be really good to hear your thoughts on my blog. I know I have some followers via facebook but it would be great to get your comments and following on the actual blog)
This is a bit of a complex one so here goes...
After a good base coat to avoid staining, apply a light pink to eight nails and lavender colour to one nail on each hand - choose a different nail on each hand. I used Bourjois So Laque Ultra Shine in Rose Satin for the pink and Prevail Nail Lacquer in Lush Lounge for the lavender.
Once dry, using a white nail art pen such as Models Own Nail Art Pen in white draw a deep semi circle on the lavender nails
Then fill in the top half of the semi circle with one coat of white - I used Models Own Pro Limited Edition in French White
Allow the white to dry and then create the cupcake base by adding a pink tip with a 'frilly' base. Just paint across the tip moving the brush in a zigzag motion to give the impression of frosting. I used Models Own in Pastel Pink.
While that dries, start applying the various designs to different nails. Firstly, I created candy stripes using a thin brush and Bourjois One Second Texture Silcone Gel Nail Enamel in Rose Cupcake (apt name!)
On another nail I did a 'hundreds and thousand' style design adding random small dots of various pastel colours, just using the corner edge of each brush. My selection of colours were Rimmel 60 Seconds 620 'How do you Lilac it', No7 Stay Perfect Nail Colour in Minty Fresh, Nail Paint by Barry M in Lemon Ice Cream, Ruby & Millie Nail Colour in Green 710C and Bourjois One Second Texture Silcone Gel Nail Enamel in Rose Cupcake.
On my little fingernail I created a simple white polka dot design using the dotter on the Models Own white nail art pen.
Now, going back to the cupcake fingers apply vertical stripes to define the cupcake case. I used a Models Own Nail Art Pen in Pink.
On the last nail add a wide tip using the lavender base colour of the cupcake nail
Now back to the cupcake finger, using the colours used on the 'hundreds and thousands' nail add some small random flecks to the white part of the cupcake and a bejewelled cherry on top. I used a pink rhinestone from an assortment pack, Broadway Nails Fashion Diva 3D Art Deluxe Nail & Body Art Kit. The best way to apply these is to add a dot of clear top coat to the nail and then using a toothpick, deep the end in some clear top coat, pick up the rhinestone and dot it on.
Add a shiny top coat to all nails and there you have it... nails good enough to eat (not literally!)!
Here's a shot of the other hand...
and here's the kit
(By the way, it would be really good to hear your thoughts on my blog. I know I have some followers via facebook but it would be great to get your comments and following on the actual blog)
This is a bit of a complex one so here goes...
![]() |
| Step 1 - Base colours |
Once dry, using a white nail art pen such as Models Own Nail Art Pen in white draw a deep semi circle on the lavender nails
![]() |
| Step 2 - Outline semi circle |
![]() |
| Step 3 - Fill in outline |
![]() |
| Step 4 - add cupcake base |
![]() |
| Step 5 - Candy stripes |
![]() |
| Step 6 - Hundreds and thousands |
![]() |
| Step 7 - polka dots |
![]() |
| Step 8 - Define cupcake base |
![]() |
| Step 9 - Lavender tip |
![]() |
| Step 10 - Finishing touches to cupcake |
Here's a shot of the other hand...
and here's the kit
![]() |
| The kit |
Happy painting...the nailist xxx
Labels:
Barry M,
Bourjois,
bright pink,
complex,
cupcakes,
dots,
mixed design,
Models Own,
Models Own Pro,
nail art,
No7,
polka dots,
Prevail,
rhinestones,
Rimmel,
Ruby and Millie,
spots,
stripes,
tips
Subscribe to:
Posts (Atom)