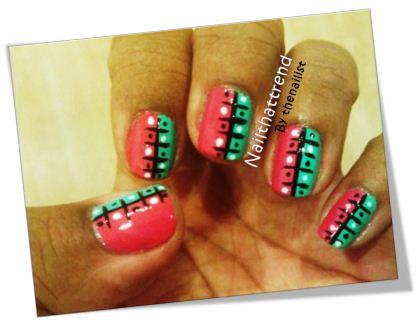
Taking inspiration from all the neon tribal prints in the shops at the moment I thought I'd give tribal a go. It's a good one for if your hand isn't too steady as perfect lines aren't a must. You can also stop halfway and still have an effective look.
Here's the finished product...read on for a step by step guide
Start by filing your nails into an even shape - this design works with both square and round tips. And prep nails with a good base coat and allow to dry before starting. I used Bourjois So Perfect! Base Corretice Texture Gel.
 |
Step 1 - Apply a turquoise colour all
over your nails. I used Fearne colour Mint Green. |
 |
| If the colour is thin then apply two coats allowing to dry in between and after |
 |
Step 2 - Create the two tone effect
|
Apply a hot pink colour over the turquoise on one side. Try to use a fairly dense coloured polish with a slim brush. I used Nail Polish by H&M 'Check me out'. Switch the side of the two tone on the other hand - so in this case I painted the pink on the left hand side of my right nails.
 |
| Step 3 - Define with a black line |
 |
| A nail art pen is a must |
To get such a thin line you either need to customise a normal small paintbrush by trimming down the bristles or use a nail art pen. I used Models Own Nail Art Pen in Black.
If you're unsure if you can keep a steady hand for much more you can stop here and you still have a great look - just finish off with a clear top coat. To get the full tribal look, read on...
 |
| Step 4 - Horizontal dashes |
Add four dashes along each vertical. Don't worry about being too exact but try and leave a large enough space between each for a dot.
The great thing with certain nail art pens, like these Models Own ones I've used, is that they have two different applicator tips - a brush and a dotter.
Using the dotter on a white pen, add 5 very small dots of white on each nail in between alternate gaps in the horizontal lines. Changing sides on each nail to add extra interest
 |
| Step 6 - Add black dots |
Repeat the process filling in the remaining gaps with black dots
Clean the edges of your nails with a nail polish remover soaked cotton bud and then finish off with quick top coat.
 |
| Step 7 - Top coat for a glossy finish |
 |
| Ta dah - Tribaltastic nails in 7 easy steps! |
 |
| The kit |
My top tips
- Allow each layer to dry
- Don't fret about getting the lines straight - the tribal look isn't about perfection
- Swap your colours around - try black and white with yellow lines and blue and yellow dots
- If you want to avoid potentially ruining your nails when cleaning edges just leave til the next day and after washing your hands the excess on you skin will easily come off by scraping your nail along the edges
Happy painting...the nailist xx


No comments:
Post a Comment