Showing posts with label No7. Show all posts

Sunday, 6 January 2013

Dark side of the half moon

Hey there, it's been a while but I'm back!

I wasn't going to blog these nails but for a few reasons I changed my mind. So I work in marketing in the retail industry and I get to here about up and coming trends and the word on the street is that come Spring/Summer nail art with be out and stripped back nails will be in! It will be all about muted colours and very simple designs such as the half moon. I'll still be going strong with nail art mind you!

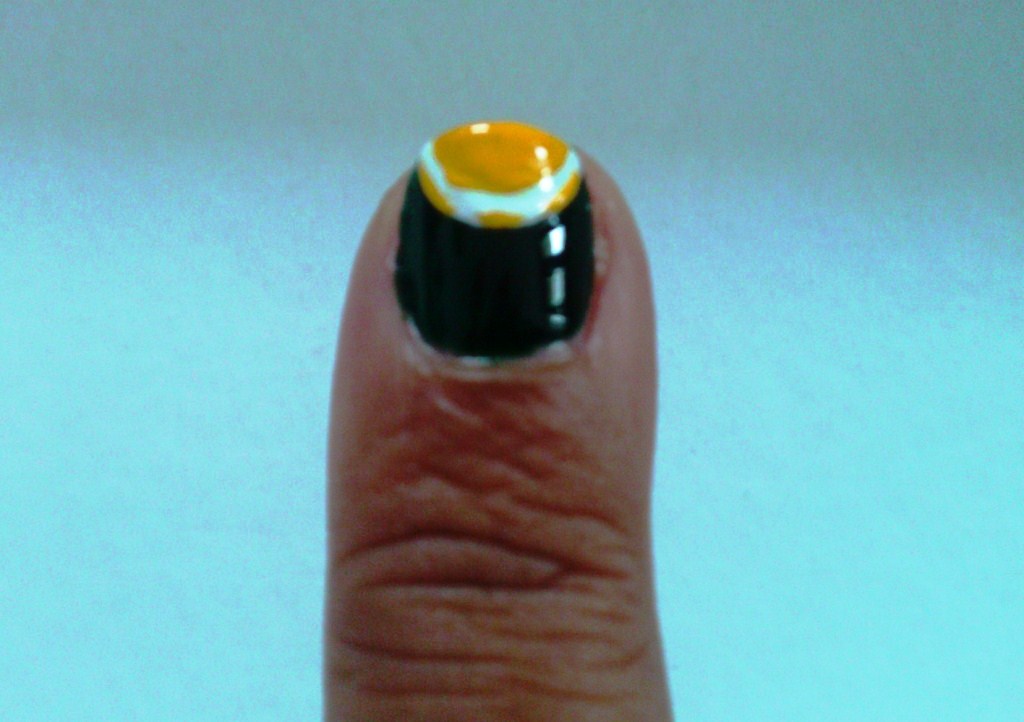
On a recent photo shoot I was at the nail artist did a half moon design in a navy and gold colour combo which I just loved, so I had to recreate it (I used a slightly lighter coloured blue and did bigger half moons)

So the trends news and the colour combo were two reasons for me deciding to blog this look but another is that this has lasted for a whole week without any chips whatsoever and no top coat touch ups! I'm well impressed particularly as the blue colour is a very cheap brand. It's two coats of Angelica Nail Colour in Sapphire 55 from Primark, which I picked up for the grand price of £1.50!

I then added the gold half moon using a nail art pen from a No7 Christmas gift set and finished off with a coat of Seche Vite Quick Dry Top Coat.

Simple but very effective!

Happy painting... the nailist xxx

Sunday, 23 December 2012

Christmas nail art overload!

So it's almost the night before Christmas and up til now I haven't done any Christmas inspired nails. I've had a few designs in mind but for one reason or another haven't had time to do them. So tonight it's a Christmas nail art overload! 
It will take me ages to go through how I did each nail so I won't go there, but here's which polishes I used...

Rudolph thumb
Base colour - No7 Stay Perfect limited edition in Sultry Sands
Face - Essie Nail Colour in Lady Godiva
Eyes - 17 Lasting Fix in Mini Skirt (from limited edition Best of British nail art kit) and Models Own nail art pen in black
Nose - 17 Fast Finish in Knockout Red (from limited edition Best of British nail art kit)

Christmas tree index finger
Base colour - No7 Stay Perfect limited edition in Sultry Sands
Tree - one coat of Ruby and Millie Nail Color in Green 720C followed by a coat of Bad Apple in Green Bramley
Tinsel - 17 Fast Finish in Knockout Red (from limited edition Best of British nail art kit) with dots using a No7 nail art pen in silver
A silver nail art diamante for the star on top!

Santa suit middle finger
Base colour - 17 High Gloss in Risky Red
Fur trim - 17 Lasting Fix in Mini Skirt (from limited edition Best of British nail art kit)
Belt & buttons - Models Own nail art pen in black

Christmas pudding ring finger
Base colour - No7 Stay Perfect limited edition in Sultry Sands
Christmas pud - Essie Nail Colour in Lady Godiva
Icing - 17 Lasting Fix in Mini Skirt (from limited edition Best of British nail art kit)
Berries  - 17 Fast Finish in Knockout Red (from limited edition Best of British nail art kit)
Holly leaf - Ruby and Millie Nail Color in Green 720C

Gift little finger
Base colour - Barry M  Nail Paint Instant Effects in Gold Foil
Ribbon & bow - 17 Fast Finish in Knockout Red (from limited edition Best of British nail art kit)

My particular favourite is Rudolph!

Then I've just mixed up the designs on the right hand...
Right I'm going to eat my body weight in mince pies!

Merry Christmas and happy painting... the nailist xxx

Tuesday, 11 December 2012

Accidental silver tips

They're accidental as I intended on doing a purple base with two silver vertical half moon lines, so it divided the nail into 4 purple sections... but I went wrong on the first nail so improvised!
The purple base colour is Mavala in 30 'Mexico' and I free hand painted on the silver design using a No7 nail art pen from a Christmas gift set. It's basically two outward bracket shaped thick lines touching in the middle and then the top section filled in.

Happy painting... the nailist xxx

Sunday, 18 November 2012

Stripe out

It's been a week since my last post because I've had a busy busy week with no time to do my nails - shocking I know! The main culprit is putting in some extra hours at work but I also went to my first yoga class on Tuesday (only just stopped aching but loved it!) and also out for obligatory Thursday night cocktails (Thursdays are the new Fridays!).

Low light of the week was my thumb nail breaking and taking some skin with it (youch!). Highlight of the week was Children in Need charity day at work in which there was a 50p nail polish lucky dip - imagine my excitement! I was by far their best customer and while doing my bit for charity bagged myself around 10 new polishes. Favourites were some Butter London (love this brand) and a couple of Bad Apple polishes which, as far as I know, are fast becoming popular - or I might just be behind the curve, who knows! Anyway, one of them features in today's post...
The base colour is two coats of No7 Stay Perfect in Me Me Me! then, nail by nail, angled striping tape followed by a coat of Bad Apple in 3D Arkansas. Make sure you tape is stuck down right to the edges before applying the top colour and also be sure to peel it off almost straight away before the paint starts to dry. Hopefully you can see from the pic that the Bad Apple Arkansas is a lovely iridescent turquoisey pink.

Sorry about the ugly thumb  - makes me look like I have man hands :o(

Finished with a top coat of Seche Vite quick dry.

Happy painting... the nailist xxx

Friday, 2 November 2012

Baby you're a firework - or not in this case!

After the success of my Halloween nail design, I set my sights on creating something fab for Bonfire night. EPIC FAIL!

I still think my idea was a good one but the execution not so much. I intended on doing a half moon design which looked like a Catherine Wheel firework but I've ended up with regular old bonfires!

Apologies for the very dodgy photo - they were a nightmare to take without flash glare so I've had to do a bit of post light balancing which isn't great at all - they are a lot more glittery and fire like in the flesh! Also you may notice my thumb nail is looking a bit worse for wear around the edges - I've got a really low break, too low to cut off (ouch!) so I've had to put a silk wrap on to hold it together but the brush-on gel (basically the essential bit which makes it all bind together) was all dried up. So I just had to cover the silk bit with base coat, which of course doesn't really work! I give myself a hour tomorrow before I end up with a painful ripped off nail.

Anyway, all in all not my finest work but topical all the same.
I started with a base of Estee Lauder Pure Colour in 20 Perfect Storm. Then once dry went over this with Barry M Nail Paint in Black Multi Glitter, leaving a semi circle of the base colour exposed at the base of the nail.

I then just built up the sparks of a variety of colours, creating flicks with a striping brush:-
Barry M Nail Paint Instant Effects in Gold Foil
17 Fast Finish in Potion
17 Fast Finish in Fury
17 HoloNial Polish in Silver
No7 Speed Dry in Queenie (this is the small flashes of red/pink)
Barry M Nail Paint in Silvery Lilac
LA Splash Nail Polish in Midnight Rain
No7 Stay Perfect Limited Edition in Golden Palms ( I used this one to define the edge of the half moon too)

Here's a pic of the whole kit


As always, finish off with a top coat to protect the design - I used INM Out the Door

Happy painting... the nailist xxx

Wednesday, 17 October 2012

Unleash your inner pink... take 2!

I wasn't very happy with the last ones so here's a second attempt at a Breast Cancer Awareness Month inspired design... much better I think! What do you think?

Colours used:
Pale pink - Models Own Nail Polish in Pastel Pink
Dark pink - Bourjois 1 Second Nail Polish in Rose Cupcuke
Silver details - No7 nail art pen from a Christmas 2011 gift set

I had to use a striping brush (very thin paint brush) to create the detail in the dark pink

Happy Painting... the nailist xxx

Monday, 15 October 2012

Unleash your inner pink

October is Breast Cancer Awareness month so I'm unleashing my inner pink in support of the campaign!

I started with a one coat base colour of No7 Stay Perfect in Milan, which is gorgeous dense glitter polish... one of my favourites. Then free hand painted the baby pink, which is Models Own Nail Polish in Pastel Pink, over the full nail leaving a slightly curved peek-a-boo triangle at the base. I actually originally added a defining line of bright pink with a Models Own Nail Art Pen but it was too luminous, so I went over the top using a striping brush and Bourjois 10 Days No Chips shade 15 - which is why the lines look a bit like country lanes! Oh well.. it's for charity!

Check out Breast Cancer Care's Pink Friday's fundraising page for ideas of how you can 'Unleash your inner pink'

Happy Painting... the nailist xxx

Sunday, 7 October 2012

Braid it!

All of a sudden it's Sunday evening and I don't know where the weekend has gone! Well... I did spend a ridiculously large amount of time playing with my new phone.. a Samsung Galaxy SIII - it's amazing. Got it out the box at midday and before I knew it, it was dinner time! Anyway, I'll stop waffling as I, of course, still found time to do my nails and here's today's design...
It's basically made up of free hand alternating strokes of three colours. I used No7 Stay Perfect Nail Colour in Sunshine, which is the metallic. The black is Max Factor Limited Edition Nailfinity in Onyx and the bronze is an unnamed bottle from an FCUK nail gift set.

I learnt the technique on a YouTube tutorial and it definitely requires concentration to make sure you do the stripes in the right order, but worth the effort as the overall effect is fab.

Happy painting... the nailist xxx

Sunday, 30 September 2012

Viva Las Vegas!

Today is a second stab at a Vegas design for Chelsea. Trying to capture the glitz and glam of Vegas with some nail art detail. There's three different type of nails which can be worn as is or used on every single nail. I've tred to mix it up a bit as my last attempt was OTT nail art detail. Hope you like it!...


So step by step.. here goes

Start with the base colour on all nails. The glittered nails have a black base, I used Max Factor Nailfinity in Onyx. The cream is No7 Anniversary Colour in 60's Mini Skirt and the index finger has a deep green to match poker table felt.. I used Ruby & Millie Nail Colour in Green 720C .

Step 1
Once dry, add a glitter polish to the black nails. I've chosen one with lots of different colours, Nail Polish by H&M in Confetti, but you could use a single colour... anything glitzy basically!

Step 2

Now to both index fingers, using a white nail art pen, add a semi circular tip guide line.

Step 3
Then fill the circle in with a white polish such as Barry M in Matt White.

Step 4

While that's drying, use the dotter on a black nail art pen to create the dice pattern on the middle fingers. You can pick whichever numbers you'd like but I think 5 and 6 look more obviously like dice.

Step 5

Once the white semi circles have dried you can add the poker chip detail... this is the most difficult part.

Step 6 left
Draw a smaller semi circle using a primary colour, leaving a small white border - it helps to use a nail art pen or small brush for accuracy. Then add detail to the white border creating a broken line of two long dashes and one shorter dash in the middle.

Step 6 right
Then finally add the top have of the chip value numbers. Pick whatever numbers you find easiest to draw.

Step 7
If needs be, add a second coat of glitter to the black nails, then finish off with a a quick dry top coat to all nails. Viva Las Vegas!

Happy painting... the nailist xxx


Wednesday, 26 September 2012

Grapevine

Quick, simple, juicy grape coloured autumn design....
The base is two coats of Rimmel 60 seconds in 615 Fast & Fushcia. Once dry, I added a stripe of Bourjois 10 days No Chips shade 23 and then a stripe of purple which is a No7 unnamed shade nail art pen from a Christmas giftset. To get a glossy finish I added a coat of Seche Vite quick dry top coat. 

The trick with a layered design like this is to use dense coloured polishes that can be added over the base colour in just one coat - too many layers and it will take ages to dry and you'll probably end up smudging.

I just love the colours as they're so autumnal and remind me of one of my favourite things... wine!

Happy painting... the nailist xxx


Monday, 24 September 2012

This weekend's purchases!

So as predicted I couldn't resist buying some new polishes! Here are the little gems that have found their way into my collection this weekend...


We have (from left to right):-
Makeup Academy in U R FAB from their Love Hearts' Collection
No7 Stay Perfect Nail Colour in Thunderstorm
Bourjois 10 day No Chips shade 23
Bourjois Magic Nail Polish Remover
Makeup Academy Nail Quake Crackle Glitter in Pink
Saturday Night Out cosmetics Nail Polish shade 38

The only thing I've tried so far is the Bourjois Nail Polish Remover which is AMAZING! Does what it says on the tin (1 second removal per nail without cotton wool) and is a cut above other products like this on the market. Time will tell if it's effectiveness is short lived but for now it seems to be doing the trick and also has a pleasant almond scent and a slightly moisturising effect. The purchase was made even better as Bourjois cosmetics are on Buy get one half price in Boots at the mo and I used my Advantage Card points, so they were free!

the nailist xxx


Sunday, 23 September 2012

Stamping!

As you will see I've given the blog a bit of a facelift today - if you normally view on a mobile take a look on a desktop if you can. Hope you like it!

Now I've been obsessed with nails and nail art for over 20 years but it's only since starting this blog that I've discovered nail stamping. I've always been a free hand nail artist and pride myself on having a pretty steady hand but there's only so much detail you can achieve. So after reading about nail stamping on various other blogs and seeing the amazing designs that can be achieved, I decided to invest in some Konad stamping equipment. I bought a stamper and scraper and the Bundle Monster 25pc plates from Amazon and got started... turns out there's obviously a knack which hopefully comes with practice! My first attempt isn't great and I was in two minds whether to share but thought I might as well so hopefully we'll see some progress in future posts.
I started with two coats of Max Factor Limited Edition Nailfinity in Onyx. Then, taking plate number BM-205, I used No7 Anniversary Colour 50's Bobby Socks to create the butterfly design. You basically paint the colour onto the plate, scrap off the excess, lift the design off the plate with the stamper and then stamp onto your nail in a rolling action. There's loads of tutorials on YouTube. Konad is the main manufacturer and they do have Konad polishes, which they say you should use, but looking at other blogs you can use normal polishes too, although I suspect there's certain ones which work better.

The kit


Watch this space for better attempts!

Happy painting... the nailist xxx

Sunday, 16 September 2012

Snow leopard

I sorted my nail polish collection out this weekend (I know.. rock n roll lifestyle!) and it's official, I have a serious addiction! I own 366 nail polish, 22 nail art pens and a ridiculous amount of base coats, top coats, nail wraps and nail decorations! No doubt there are more lurking in the recesses of handbags and drawers yet to be counted! I had to relegate 11 to nail polish heaven as they were gloopy beyond repair.

So after dealing with my silent shame, I have beautifully arranged them all by colour in a variety of boxes so at least I can start to make use of my whole collection, rather than the same old faithfuls. I would say that I  have enough and won't be buying anymore... but I would be lying!

Apart from my undeniable obsession with nail polish I also love animal print. Be it zebra or leopard I always find myself heading straight for the bold prints when clothes shopping, although I draw the line at zebra print trousers! Lucky for me animal print looks fab on nails too... check out today's design

Here's how..

I used Sally Hansen's Miracle Nail Thickener as a base coat as my nails seem to be splitting a lot recently. Once your base coat is dry, apply a base colour in a light grey or beige, I used Models Own Nail Polish in Concrete Mixer. Then create a gradient by sponging on three layers of a metallic grey or silver such as No7 Stay Perfect Nail Polish in Sunshine, going about half way down each nail.

Step 1 - created a graduated base with a grey/beige and metallic grey/silver
Now for the animal print... using a black nail art pen draw on a leopard pattern. Best way I can describe to do this is by drawing jagged circles, interspersed with a few blobs. So if you don't have a steady hand.. don't worry because shaky is a bonus!

Step 2 - Animal print it up!
Then to accent the print, fill the jagged circles in with a dot of white, again using a nail art pen or thin brush. Let it all dry, clean up the edges and finish with a high shine quick dry top coat.

Happy painting... the nailist xxx

Tuesday, 11 September 2012

Wrapping paper

So today's design has ended up looking like wrapping paper... which wasn't what I originally had in mind! It definitely looks better in the flesh as the matt vs glossy effect doesn't come across that well on screen.

I wanted to test run a new polish which is the base colour - W7 Nail Polish in Matt Green. It's got more of a satin finish than completely matt which I really like. After two coats of the green, I added an angled tip to each nail in Bourjois 10 days Nail Enamel shade 15. The polishes in this range are great for applying coloured tips as they have really small brushes with angle end.

Over the top I then added two silver stripes using a No7 nail art pen I have from a limited edition Christmas set. The pen is really good as it gives a dense colour in just one stroke.

I finished off by adding a high shine top coat just over the pink and silver so there's a real contrast between the matt green and the tips. I think it's this, and the colour combo, that makes it look like fancy wrapping paper!

Happy painting... the nailist xxx

Wednesday, 22 August 2012

Every cloud has a silver lining

So there are times when a bit of bling is order - probably not for every day at work! - but I wanted to experiment with rhinestones and ended up with a design more suited to a Saturday night than the 9-5! Still at least I'll be prepared for when I'm next getting glammed up!

Start off with a pearlescent base colour - I used Primark Beauty Nail Polish in an unnamed silvery white

Step 1 - Pearlescent base colour
Then, using a black nail art pen or thin brush, add a deep V guidance line onto every nail leaving a gap between the point of the V and the cuticle.

Step 2 - V guiding line
Then fill in above the V with a grey colour. I used one of my favourites - No7 Limited Edition Stay Perfect Nail Colour in Grey Matter.

Step 3 - fill in the V
Once this is dry, add a line of silver glittery polish using either a nail art pen or thin brush, just above the original black guiding line. I had a No7 nail art pen from a Christmas gift set which gave a lovely dense finish.

Step 4 - add the silver lining!
Then redefine the V with a black line underneath the silver. This should take the V to the cuticle/base of your nail.

Step 5 - redefine the V
Select a nail on each hand to embellish. Doing one nail at a time, add a line of clear top coat over the silvery line to create a tacky surface. Then, using a clear top coat dipped toothpick pick up and dot on a line of round shaped diamante rhinestones and a teardrop shape one at the base. I added the rounds first, moving from the outer edges towards the centre and added the teardrop in between last. This is so you know you have enough space to have a equal number of rhinestones on each side of the V.

Step 6 - Bling time
Finish off with a shiny top coat on all nails, which will help further seal on the rhinestones. Clean up the edges with an acetone soaked cotton bud . Blingtastic!

The kit

Happy painting... the nailist xxx

Sunday, 19 August 2012

Cupcake dreams

So one of my many dreams (I'm a bit of an idealistic dreamer!) is to one day own a cupcake cafebar, famous for the best cupcakes in town which you can buy to take away or sit in an enjoy with a cocktail. There would of course be somewhere to get your nails done while sipping your cocktail. I imagine the decor will be retro glam - think American diner meets Breakfast at Tiffany's! Well, one day maybe... In the meantime the dream has inspired my latest design, 'Cupcake Dream's, and here's the how to.

(By the way, it would be really good to hear your thoughts on my blog. I know I have some followers via facebook but it would be great to get your comments and following on the actual blog)
This is a bit of a complex one so here goes...

Step 1  - Base colours
After a good base coat to avoid staining, apply a light pink to eight nails and lavender colour to one nail on each hand - choose a different nail on each hand. I used Bourjois So Laque Ultra Shine in Rose Satin for the pink and Prevail Nail Lacquer in Lush Lounge for the lavender.

Once dry, using a white nail art pen such as Models Own Nail Art Pen in white draw a deep semi circle on the lavender nails

Step 2 - Outline semi circle
Then fill in the top half of the semi circle with one coat of white - I used Models Own Pro Limited Edition in French White

Step 3 - Fill in outline
Allow the white to dry and then create the cupcake base by adding a pink tip with a 'frilly' base. Just paint across the tip moving the brush in a zigzag motion to give the impression of frosting. I used Models Own in Pastel Pink.

Step 4 - add cupcake base
While that dries, start applying the various designs to different nails. Firstly, I created candy stripes using a thin brush and Bourjois One Second Texture Silcone Gel Nail Enamel in Rose Cupcake (apt name!)

Step 5 - Candy stripes
On another nail I did a 'hundreds and thousand' style design adding random small dots of various pastel colours, just using the corner edge of each brush. My selection of colours were Rimmel 60 Seconds 620 'How do you Lilac it', No7 Stay Perfect Nail Colour in Minty Fresh, Nail Paint by Barry M in Lemon Ice Cream, Ruby & Millie Nail Colour in Green 710C and Bourjois One Second Texture Silcone Gel Nail Enamel in Rose Cupcake.
Step 6 - Hundreds and thousands
On my little fingernail I created a simple white polka dot design using the dotter on the Models Own white nail art pen.

Step 7 - polka dots
Now, going back to the cupcake fingers apply vertical stripes to define the cupcake case. I used a Models Own Nail Art Pen in Pink.

Step 8 - Define cupcake base
On the last nail add a wide tip using the lavender base colour of the cupcake nail

Step 9 - Lavender tip
Now back to the cupcake finger, using the colours used on the 'hundreds and thousands' nail add some small random flecks to the white part of the cupcake and a bejewelled cherry on top. I used a pink rhinestone from an assortment pack, Broadway Nails Fashion Diva 3D Art Deluxe Nail & Body Art Kit. The best way to apply these is to add a dot of clear top coat to the nail and then using a toothpick, deep the end in some clear top coat, pick up the rhinestone and dot it on.

Step 10 - Finishing touches to cupcake
Add a shiny top coat to all nails and there you have it... nails good enough to eat (not literally!)!
Here's a shot of the other hand...

and here's the kit

The kit


Happy painting...the nailist xxx